3D printing with ABS or ASA filaments isn’t always smooth sailing especially when you’re aiming for professional-grade prints. Overture ABS is a popular choice due to its durability, heat resistance, and exceptional post-processing capabilities. However, without the right Orca Slicer profile and raft settings, issues like warping or poor adhesion can quickly ruin your print.
This guide is designed to help you master ABS and ASA printing by optimizing your slicer profile, understanding the importance of rafts, and fine-tuning every setting to get consistent, high-quality results.
Understanding ABS and ASA Filament for 3D Printing:
ABS (Acrylonitrile Butadiene Styrene) is known for its mechanical strength, making it a favorite for functional prototypes and durable parts. ASA (Acrylonitrile Styrene Acrylate), on the other hand, is a UV-resistant sibling of ABS, designed for outdoor use without yellowing or degrading in sunlight.
Key differences:
- Heat Resistance: Both filaments withstand high temperatures, but ASA performs better outdoors.
- Warping: ABS is prone to warping due to its shrinkage rate, whereas ASA is slightly more forgiving.
- Surface Finish: ASA offers a smoother, more matte finish compared to the glossy nature of ABS.
When switching from PLA, you’ll need to adjust temperature profiles, bed adhesion strategies, and print speeds to accommodate the unique characteristics of these materials.
Why Print with Overture ABS?
Overture ABS stands out because of its consistent diameter tolerance and lower likelihood of clogging or under-extrusion. It’s also widely trusted for creating parts that require sanding, painting, or acetone smoothing.
Benefits include:
- Reliable Quality: Less prone to inconsistencies compared to budget filaments.
- Enhanced Strength: Ideal for functional components like brackets or enclosures.
- Post-Processing Friendly: Easily sanded or chemically treated for a professional finish.
By combining Overture ABS with Orca Slicer’s fine-tuned profiles, you can unlock cleaner first layers, better layer adhesion, and reduce failed prints caused by curling or poor bed grip.
Why Use a Raft with Overture ABS?
Warping is the single biggest challenge with ABS. Rafts act as a sacrificial foundation, ensuring that your main part adheres perfectly without direct contact issues on the bed surface.
Advantages of using a raft:
- Improved Adhesion: The extra surface area grips better on heated beds.
- Warp Reduction: Compensates for thermal contraction during cooling.
- Smoother Bottom Layer: The print separates cleanly from the raft, leaving a uniform surface.
For large, flat parts or complex geometries, a raft is a must-have tool that can save you from multiple failed attempts.
Recommended Orca Slicer Profile Settings for Overture ABS:
A well-optimized profile is the backbone of successful ABS printing. Here are the go-to settings for Orca Slicer:
- Nozzle Temperature: 245°C – 255°C
- Bed Temperature: 100°C – 110°C
- Print Speed: 40–60 mm/s, with first-layer speed reduced to 15–20 mm/s.
- Cooling: Disable the cooling fan for the first few layers to avoid warping.
- Retraction: 1.5 mm at 35–45 mm/s to avoid stringing.
Always calibrate extrusion flow using test prints to eliminate dimensional inaccuracies and avoid under- or over-extrusion issues.
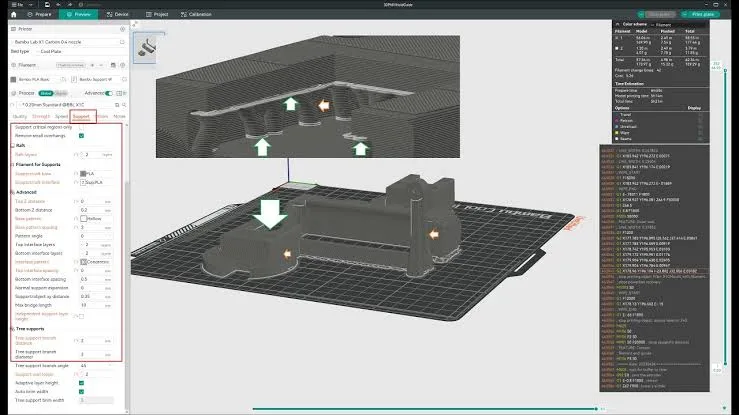
Best Raft Settings in Orca Slicer for Overture ABS:
Raft settings can make or break your print’s first layer quality. The following configurations are recommended:
- Raft Layers: 3–4 for a solid foundation.
- Raft Air Gap: 0.25 mm to ensure easy separation.
- Raft Expansion: 5 mm beyond the model base.
- Raft Top Layer Speed: Around 15 mm/s.
Pro Tip: Enable a “brim around raft” if you’re still experiencing corner lifting. Adjust the Z-offset slightly if the part adheres too tightly to the raft.
Best Practices for ASA Printing with Orca Slicer:
ASA demands similar settings to ABS but with specific tweaks:
- Higher Nozzle Temperature: 250°C – 260°C for optimal layer bonding.
- Minimal Cooling: Use fan speed below 10% or disable it for the first layers.
- Enclosure Use: Maintaining a stable environment is essential.
- Slower Speeds: Aim for 35–50 mm/s to minimize warping and enhance surface finish.
When paired with Orca Slicer, ASA prints achieve a high level of consistency, especially for outdoor components.
Additional Tips for Perfect ABS/ASA Prints:
- Use Adhesion Aids: ABS slurry, Magigoo, or glue sticks can make a big difference.
- Control Drafts: Even small gusts of air can lead to cracks or delamination.
- Enclosure Heating: Maintain chamber temps between 45°C – 60°C for improved stability.
- Clean Build Surfaces: Oils or residue can prevent proper bed adhesion.
Mastering these small details will drastically improve your overall success rate when working with ABS and ASA materials.
Top 3D Printer Filament Brands for ABS & ASA:
While Overture ABS is a solid choice, it’s good to know alternatives:
- Overture ABS: Known for its balance between cost and quality.
- Polymaker ASA: Exceptional UV resistance for outdoor projects.
- eSUN & Sunlu: Affordable and reliable options for budget-conscious makers.
Each brand behaves slightly differently, so adjusting slicer profiles for each filament type is crucial.
Fine-Tuning Layer Height for ABS and ASA Prints:
Layer height plays a significant role in determining the quality and strength of ABS and ASA prints. For Overture ABS, a layer height of 0.12–0.2 mm is often the sweet spot for balancing detail and print time. Thicker layers, such as 0.25 mm, are better suited for functional parts where speed and durability matter more than visual appeal. With Orca Slicer, you can easily experiment with adaptive layer height to ensure smoother transitions on curved surfaces.
This feature automatically adjusts the layer thickness based on geometry, reducing visible layer lines. While ABS benefits from slightly thicker first layers for better adhesion, ASA prints often achieve a superior finish with consistent layer heights throughout the print. Always remember that fine-tuning your layer height in combination with optimized temperature and speed settings can dramatically enhance both surface quality and overall print strength.
Importance of Enclosure Temperature Control:
Temperature control is critical for successful ABS and ASA prints, as fluctuations in ambient temperature can cause severe warping or layer splitting. Enclosures help maintain a stable printing environment by trapping heat around the model. For Overture ABS, keeping the enclosure temperature between 45°C and 60°C significantly improves interlayer adhesion and reduces the risk of cracks. ASA, due to its outdoor durability, also benefits from a controlled warm environment, preventing stress during cooling phases.
In Orca Slicer, enabling chamber temperature monitoring (if your printer supports it) helps maintain optimal conditions throughout the print job. When printing without an enclosure, users often face challenges such as corner lifting, uneven layers, or surface roughness. Therefore, investing in a proper enclosure or building a DIY solution can be one of the most effective upgrades for consistent ABS and ASA prints, especially for larger or intricate parts.
Conclusion:
Getting the perfect ABS or ASA print is not just about using the right filament, it’s about fine-tuning every detail in your slicer. With Overture ABS, a calibrated Orca Slicer profile, and a well-configured raft, you can achieve professional-level results without the headaches of warping or failed prints. Whether you’re creating functional prototypes or outdoor components, the strategies outlined in this guide will set you up for success.
Frequently Asked Questions:
It’s not as easy as PLA but manageable with rafts and proper slicer settings.
You can, but expect higher chances of warping. An enclosure is recommended.
Start between 245°C – 255°C, and adjust based on your printer and environment.
Not exactly, ASA needs slightly higher temperatures and slower cooling.
Platforms like Printables, Thingiverse, and GitHub host community-tested profiles.