Whether you’re a hobbyist printing your favorite miniatures or a maker producing functional prototypes, staying on top of Orca Slicer updates isn’t just optional, it’s essential. Each new release brings sharper tools, smoother prints, and smarter fixes. Yet, many users put off updating because they fear losing custom settings or disrupting a working setup.
This guide aims to make the update process as seamless and stress-free as possible. We’ll walk through the full update procedure, explain why it’s worth the time, and show you how to fine-tune settings afterward to keep your workflow optimized.
Why It’s Important to Keep Orca Slicer Updated?
For many of us, Orca Slicer is the brain behind our best 3D prints. But brains need upgrades too. Updates to Orca Slicer offer more than just cosmetic tweaks, they introduce real performance gains and smoother workflows.
Some of the biggest benefits include:
- New features like refined slicing algorithms, better tree supports, or experimental print modes.
- Bug fixes that eliminate those mysterious crashes or faulty layer generations.
- Compatibility updates for new firmware, operating systems, or third-party plugins.
- Performance boosts that reduce slicing time or improve visual previews.
Ignoring updates may seem safe, but over time, your setup can become incompatible, unstable, or just plain outdated.
Checking Your Current Orca Slicer Version:
Before diving into an update, you’ll want to verify your current version. This quick check helps ensure you’re not already up to date.
Here’s how to do it:
- Open Orca Slicer on your computer.
- Navigate to the Help or About section usually found in the top menu bar.
- Note the version number (e.g., 2.1.1).
- Visit the official Orca Slicer GitHub or website to compare with the latest release.
If you’re a few versions behind, it’s probably time to upgrade.
Backing Up Your Settings :
If you’ve spent time perfecting custom profiles, backup is your insurance policy. An update shouldn’t wipe your settings, but better safe than sorry.
Here’s how to back up:
- Open Orca Slicer.
- Go to File > Export Config.
- Select what you want to save print profiles, filament settings, printer setups.
- Save the file somewhere safe (external drive or cloud storage works well).
This allows easy restoration if anything gets overwritten post-update.
Dealing with Update Errors and Rollbacks:
While Orca Slicer updates are generally stable, occasional hiccups can happen, especially when shifting between major versions. Some users encounter crashes, missing features, or altered print behavior after an update. In such cases, it’s important to remain calm and troubleshoot step by step.
If the issue is minor, resetting configuration files or clearing the application cache may be enough. However, for more persistent problems, you might need to uninstall the latest version and roll back to the previous one. Rolling back doesn’t mean losing progress. By keeping backup copies of your settings and downloading an older version from the official GitHub repository, you can safely revert without compromising your printer’s setup.
Always check community forums like Reddit’s r/3Dprinting or GitHub issue threads to see if others are facing similar problems after an update. Often, quick fixes or workarounds are shared by fellow users. Just remember: it’s better to wait a few days after a major release if your current version is stable and you’re in the middle of a time-sensitive project.
Downloading the Latest Version of Orca Slicer:
Once you’re ready to proceed, head over to the official download source.
Steps to download:
- Visit Orca Slicer’s GitHub Releases.
- Choose the installer appropriate for your OS (Windows/macOS/Linux).
- Double-check the release notes for any breaking changes or known issues.
- Hit Download and wait for the file to finish.
Tip: Avoid third-party mirrors unless you’re sure they’re safe, stick to official sources to prevent malware or outdated versions.
Installing the Update on Your Device:
This step should feel familiar, if you’ve ever installed software before, you’ll be at home here. Just remember to close the current Orca Slicer session first.
Installation steps:
- Close Orca Slicer completely.
- Locate the installer you just downloaded.
- Launch the installer and follow the on-screen instructions.
- Accept any license agreements or prompts.
- Once installation completes, you can choose to launch the app immediately.
On macOS, you might need to drag the app into your Applications folder manually.
Verifying a Successful Update:
Don’t assume it always works. The last thing you want is to spend hours troubleshooting a bug that was supposed to be fixed.
To verify the update:
- Open Orca Slicer.
- Head to Help > About again.
- Confirm the version number matches the one from the release page.
- Load a model and slice it to make sure everything’s operational.
If things look odd or behave unexpectedly, you may need to reset preferences or reinstall from scratch.
Restoring Your Backed-Up Settings (If Needed):
Sometimes updates reset configurations or overwrite custom profiles. If this happens, your backup comes to the rescue.
To restore:
- Launch Orca Slicer.
- Go to File > Import Config.
- Select the backup file you saved earlier.
- Orca Slicer will load your saved print profiles, filament settings, and printer presets.
Within seconds, your familiar setup should be back in place.
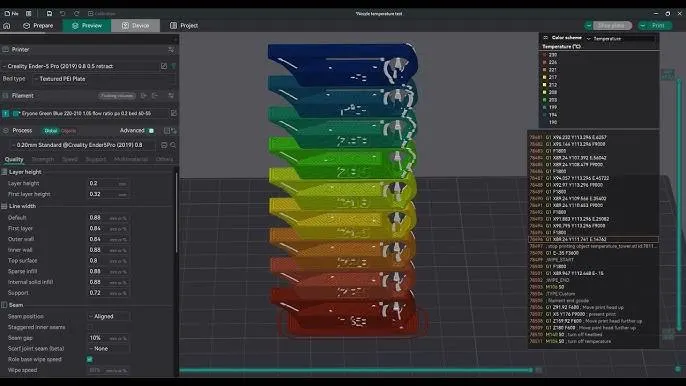
How to Change Temperature Settings After Update?
After a software update, your printer’s behavior might shift slightly, especially if default temperature profiles were altered.
Here’s how to adjust:
- Open a project in Orca Slicer.
- Go to the Print Settings tab.
- Navigate to the Temperature section.
- Update Nozzle Temperature and Bed Temperature based on your filament type.
- Save your profile under a new name if needed, to avoid overwriting defaults.
Fine-tuning temperature ensures your prints stick to the bed and layers fuse correctly key to avoiding warping or stringing.
Keeping Track of Orca Slicer Releases and Changelogs:
If you’re someone who wants to stay on the cutting edge of Orca Slicer development, tracking release updates is key. Fortunately, Orca Slicer’s GitHub repository makes it easy to stay informed. Each release comes with detailed changelogs that outline what’s been added, improved, or fixed. These logs help you decide whether a new version is worth installing immediately or if you’d prefer to wait until more feedback is available from the community.
Beyond GitHub, you can join online forums or Discord servers focused on 3D printing, where Orca Slicer discussions are often buzzing with real-world test results. Following the developer’s update notes gives you a peek into upcoming experimental features and allows you to prepare for changes that might impact your printing workflow. Some updates introduce new slicing logic or experimental materials that can be game-changers if implemented correctly. By keeping track of these changes, you don’t just stay current, you stay ahead.
How to Adjust Retraction Settings After Updating?
One subtle update can shift retraction behavior, leading to stringing or under-extrusion. Here’s how to recalibrate:
- Load your preferred print profile.
- Navigate to the Print Settings > Retraction section.
- Change the Retraction Distance (typical PLA setting is 0.8–1.2mm for direct drive).
- Modifying Retraction Speed if needed 30–45 mm/s is common.
- Run a small test print (like a retraction tower) to validate your changes.
These micro-tweaks can drastically improve surface finish and reduce cleanup time.
How to Update Print Speed Settings?
Sometimes, an update improves slicing algorithms but changes speed presets. Make sure your printer doesn’t become a race car on rough terrain.
Steps:
- Head to Print Settings > Speed.
- Adjust speeds for Perimeters, Infill, and Travel.
- Slow down for small layers or high-detail parts (e.g., 20–30 mm/s).
- Increase for bulk infill (up to 80 mm/s).
- Save your tuned profile and test with a benchmark model like the XYZ cube.
Speed tuning is all about balance, too fast, and you lose detail; too slow, and your weekend project becomes a week-long wait.
Conclusion:
Keeping Orca Slicer updated is more than a maintenance task, it’s your gateway to better prints, faster workflows, and fewer headaches. With just a few steps check, backup, download, install, and tweak, you’ll stay ahead of the curve without compromising your custom setup.
By taking the time to adjust post-update settings like temperature, speed, and retraction, you’re not just using Orca Slicer, you’re mastering it. Stay sharp, keep experimenting, and don’t forget to slice smart!
FAQs:
No, updates typically preserve user data, but it’s always wise to back up custom profiles just in case.
New versions are released roughly every 1–2 months, depending on feature development and bug fixes.
Yes. You can uninstall the current version and reinstall an older one from GitHub’s release archive.
It might be due to incompatible settings or corrupted config files. Try resetting preferences or reinstalling cleanly.
No. Orca Slicer is a fully offline-capable tool. Internet is only required to download the update itself.