Calibrating your 3D printer isn’t just a hobbyist’s ritual; it’s essential to achieving consistent, high-quality prints. Orca Slicer, known for its modern interface and powerful slicing engine, provides a robust calibration menu that lets you fine-tune every parameter of your printer’s behavior. This guide dives into the practical steps for optimizing your print quality using Orca Slicer’s built-in calibration tools.
Whether you’re battling stringing, seeking dimensional perfection, or chasing that perfectly smooth finish, the right calibration process will elevate your prints from decent to professional-grade. Let’s explore how.
Why Calibration Matters for Orca Slicer Users?
Calibration is the foundation for reliable, accurate, and aesthetically pleasing 3D prints. If skipped, you risk poor adhesion, weak structural integrity, and inconsistent dimensional accuracy.
Why Is It Important?
- Improves surface finish and layer consistency
- Prevents over-under-extrusion
- Ensures precise dimensions
- Boosts filament efficiency
- Reduces print failures and saves time
Orca Slicer simplifies this process by offering structured tools to systematically test, analyze, and adjust.
Orca Slicer Temperature Tower: Your Starting Point
A temperature tower test is the first step to calibrating your printer for a specific filament. It prints a model with different temperature zones so you can observe how the filament behaves at various heat levels.
What to Look For:
- Surface smoothness
- Bridging and overhang quality
- Stringing or blobs
- Layer adhesion
Start with 5°C increments and analyze which zone provides the best print result. Use that temperature for future prints with that filament type.
Dialing in Flow Rate for Accurate Extrusion:
Flow rate calibration is crucial for matching your slicer’s expectations to your printer’s actual extrusion. Inaccurate flow rate leads to dimensional issues and print quality defects.
How to Calibrate:
- Print a flow rate cube
- Measure wall thickness using calipers
- Compare with the slicer settings
- Adjust the flow rate percentage accordingly
Fine-tuning this parameter improves overall print accuracy and ensures the right amount of filament is used every time.
Filament-Specific Calibration Tips:
Not all filaments behave the same way, and that’s why filament-specific calibration is essential. PLA, PETG, ABS, TPU, and other materials each have their quirks, ranging from temperature sensitivity to retraction requirements. For instance, PLA is generally forgiving and prints well with lower retraction distances, whereas TPU requires slow speeds and minimal retraction to avoid clogs or stringing. Orca Slicer allows you to create and store unique profiles per filament, making it easier to switch materials without re-calibrating everything from scratch.
To get the most out of each filament, start by performing a fresh temperature tower, flow rate, and retraction test whenever you open a new brand or batch. Even the same material from different manufacturers can behave differently due to additives and pigmentation. Orca Slicer’s material profiles can be cloned and customized, allowing you to fine-tune settings and store them permanently. This ensures consistency and saves time in the long run, especially when alternating between prints that require different material properties such as flexibility, heat resistance, or strength.
Pressure Advance: Sharpening Corners and Timing Flow
Pressure advance compensates for extrusion lag during directional changes, reducing blobs and improving sharp turns.
Available Methods:
- Line Method: Quick but less precise
- Pattern Method: Balanced accuracy and ease
- Tower Method: Most accurate, varies PA over height
Each method prints a unique model to help visualize how well your printer handles acceleration and deceleration. Adjust PA values in Orca Slicer to match the most consistent section.
Tolerance Tests: Verifying Dimensional Accuracy
When parts must interlock or fit into tight spaces, dimensional accuracy is non-negotiable. Tolerance tests help verify your printer’s mechanical and slicing precision.
How It Works:
- Print a calibration model with known gaps
- Measure gaps using calipers
- Adjust flow rate or steps/mm based on deviations
A well-calibrated tolerance ensures everything from gears to snap-fit parts works flawlessly without post-processing.
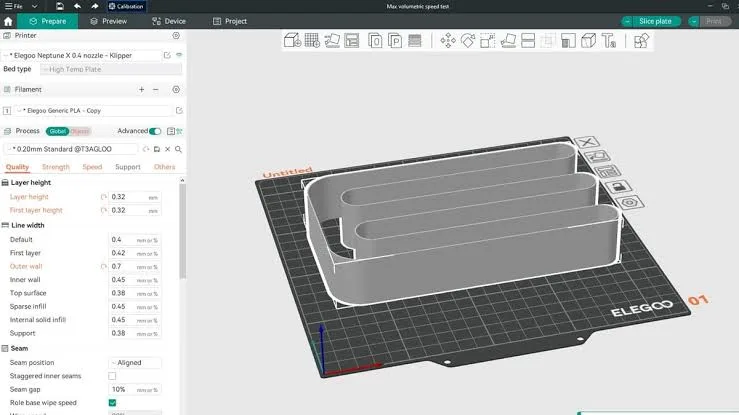
Max Volumetric Flow Rate: Speed Without Sacrifice
This test identifies how fast your printer can extrude without causing under-extrusion. Essential for speeding up prints without compromising quality.
Steps:
- Print a speed tower with increasing speeds
- Look for under-extrusion signs like gaps or missing layers
- Note the last acceptable speed
Use this data to set a safe upper speed limit for consistent results.
Vertical Fine Artifact (VFA) Test: Smoothing Out Z-Axis Woes
Z-axis artifacts like banding and shifts can ruin even the most detailed models. A VFA test prints a tall column to reveal inconsistencies in Z movement.
Things to Inspect:
- Uniformity of each layer
- Z-banding patterns
- Mechanical vibrations
Troubleshoot by adjusting stepper currents, tightening frame bolts, or lubricating lead screws. This test helps diagnose mechanical issues that software tweaks can’t solve alone.
Retraction Test: No More Stringy Messes
Stringing between parts is a common annoyance, especially with flexible filaments. A retraction tower test determines the best retraction distance and speed.
Calibration Tips:
- Start with default values (e.g., 4mm for Bowden)
- Print a retraction tower
- Observe stringing, gaps, or blobs
- Adjust settings incrementally
This fine-tuning is critical for clean prints with complex geometries or multi-part surfaces.
Layer Height and Calibration Consistency:
Layer height plays a critical role in how well calibration settings transfer between prints. Many users don’t realize that certain calibration results, especially flow rate and pressure advance, can behave slightly differently depending on whether you’re using a 0.12mm or 0.28mm layer height.
Lower layer heights, for example, require finer extrusion control and can exaggerate issues like under-extrusion or inconsistent retraction settings. Conversely, higher layers might hide minor flaws but also tend to affect surface resolution. When running calibration tests in Orca Slicer, always match the layer height of your test prints to the layer height you intend to use in your final model.
This ensures that your results are directly transferable and relevant to your real projects. Orca Slicer’s ability to save multiple print profiles with predefined layer heights makes it easier to maintain consistency across different use cases. For critical prints where dimensional accuracy or visual quality matters, maintaining alignment between calibration tests and actual print settings is key to achieving optimal results.
Troubleshooting Calibration Issues:
Sometimes, even the best tools fail to load or respond. If Orca Slicer calibration tools are greyed out or don’t work, use this checklist:
Fixes:
- Ensure a printer profile is selected
- Verify filament and nozzle settings are correct
- Update firmware and Orca Slicer
- Restart Slicer and re-import your profile
Still stuck? Reset the configuration and try a clean setup.
Orca Slicer YOLO Calibration Mode:
YOLO Mode is Orca Slicer’s automatic calibration feature, perfect for beginners or quick print prep. While not as precise as manual tests, it’s a great starting point.
Use It When:
- You want fast, good-enough results
- Testing a new filament quickly
- You’re troubleshooting small issues
Manual calibration will always yield better precision, but YOLO mode can save the day in a pinch.
Conclusion:
Proper calibration using Orca Slicer isn’t just about solving problems; it’s about unlocking the true potential of your printer. From temperature and flow to precision tolerances and Z-axis consistency, every test gets you closer to professional-grade results.
Whether you’re a weekend maker or a full-time engineer, this calibration process sets the groundwork for success. Print smarter, waste less, and build confidently.
FAQs:
The ideal order is: Temperature Tower-Flow Rate Test-Pressure Advance Calibration-Retraction Test-Tolerance Test-Max Volumetric Flow Rate-Vertical Fine Artifact Test
Go to Calibration Menu → Run each test one by one → Adjust settings based on printed results → Save updated printer profile.
It adjusts extrusion timing during acceleration/deceleration. Helps eliminate blobs and sharpens corners. Use the Line, Pattern, or Tower methods in Orca Slicer to calibrate.
It ensures correct filament output by matching expected and actual wall thickness. Calibrate using a cube and adjust the extrusion multiplier accordingly.
Possible reasons include: Printer profile not selected-Incompatible filament settings, Outdated firmware, Configuration issues (try resetting settings)