When it comes to 3D printing, slicer software can either make or break your workflow. For those who demand precision, control, and customization, the Orca Slicer interface has emerged as a standout. Built on the strengths of Bambu Studio and PrusaSlicer, Orca Slicer offers a user interface that feels both intuitive and deeply technical.
Whether you’re a hobbyist looking to fine-tune your first print or a seasoned engineer managing complex geometries, the interface delivers a rich, layered experience. This article is your deep dive into Orca Slicer’s UI from layout and tools to preview capabilities and advanced remote access.
User-Centric Dashboard: The Heart of Orca Slicer
The dashboard is where every print begins. Clean, responsive, and designed for clarity, Orca Slicer greets users with an organized workspace that balances power and accessibility.
Why it works:
- Logical tab groupings (Object, Slice, Preview, etc.)
- Drag-and-drop STL importing
- Real-time render preview
- Snap grid and axis alignment
Features to love:
- Collapsible sidebars keep the workspace uncluttered.
- Hover-tooltips explain advanced terms
- Adaptive themes for better visibility
Unlike some slicers that overload you with options up front, Orca Slicer gradually reveals depth as you explore, making the learning curve manageable without sacrificing control.
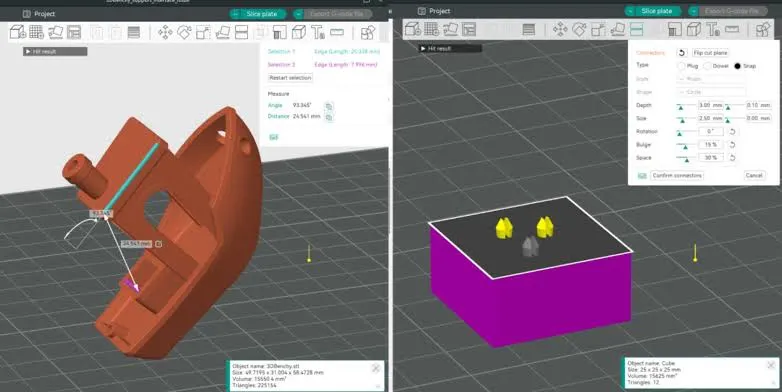
Object Manipulation: Precision Tools with Intuitive Touch
When you import a 3D model, it doesn’t just sit on the build plate; it comes alive through manipulation tools. Orca Slicer offers some of the most detailed and responsive object-handling capabilities in the field.
Key features:
- Translate (XYZ) – Move models along specific axes with exact value entry or by dragging handles.
- Scale (Uniform/Non-uniform) – Resize for fit or strength, especially useful when printing test pieces.
- Rotate – Align parts with print direction using Euler angles or intuitive rotation rings.
- Mirror – Flip geometries for left/right parts or reverse designs.
Each adjustment provides immediate visual feedback, enabling precise calibration before you ever hit “slice.” And with undo/redo functionality built in, experimentation feels safe and rewarding.
Interface Responsiveness and Real-Time Feedback:
One of the most impressive aspects of Orca Slicer’s user interface is its real-time responsiveness. From adjusting print parameters to moving models on the build plate, every change is immediately reflected on-screen. This instant feedback allows users to experiment with confidence, you can rotate a model, change the infill density, or alter print speed and instantly see the impact on slicing time and estimated filament usage.
This reduces trial and error, especially for newcomers who may not fully understand how each setting affects the final output. The smooth animations and zero lag response when navigating between tabs, loading large models, or adjusting support settings contribute to an overall fluid experience. Whether you’re working on a complex mechanical part or a quick functional print, Orca Slicer’s interface ensures that users stay in control and informed at every step of the slicing process.
G-code Preview & Layer Inspection:
This is where Orca Slicer truly shines. The Layer View feature offers an in-depth visualization of how your printer will interpret the model line by line, layer by layer.
This mode helps:
- Diagnose weak infill structures
- Check for overhangs needing support
- Visualize extrusion paths and retractions
You can:
- Use color-coded zones to detect speed changes or flow inconsistencies
- Scrub through each layer with a timeline slider
- Examine seam alignment, bridging angles, and per-layer infill types
For anyone who has wasted filament on failed prints, this mode offers peace of mind and control. It’s the difference between guessing and knowing.
Support Interface Customization: Take Control of Structures
Support generation can make or break a complex print. Orca Slicer’s support interface settings go well beyond toggling supports on or off. It’s a sandbox for engineers who need control.
You can define:
- Support pattern: Zigzag, grid, concentric
- Interface density: Adjust strength vs. removability
- Fan speed is just for support areas
- Z-offset: Prevent supports from welding to the model
Users can paint supports manually for hyper-precision or choose tree-style supports for minimal scarring. This hybrid approach allows you to strike a perfect balance between print quality and ease of cleanup.
Top Interface Layers: Crafting the Final Surface
The top layer of a print is often the most visible and most judged. Orca Slicer allows you to optimize this with:
- Ironing options – Smooths out the surface by dragging a hot nozzle over the top layers
- Overlap settings – Improves infill bonding
- Speed adjustments – Slows down surface layers for a quality finish
- Material-specific tweaks – Because PLA and PETG behave differently at the top layer
Want a glossy surface or a matte one? By adjusting these settings, you can control not just how a print functions, but how it looks and feels in your hand.
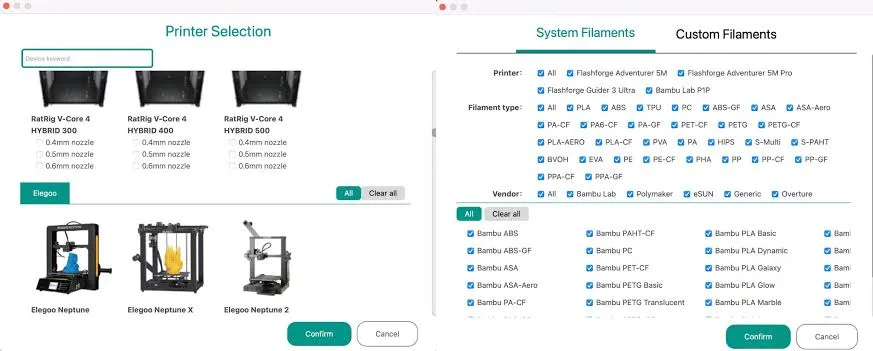
Preset Management and Profile Customization:
Orca Slicer stands out for its robust preset management system. The UI allows users to switch effortlessly between material profiles, print settings, and printer configurations without feeling overwhelmed. Each preset, be it for PLA, PETG, ABS, or TPU, comes with sensible defaults that can be tailored based on personal preferences or specific printer behavior. Users can clone, rename, export, and share profiles directly within the interface, which is especially helpful for collaborative environments or print farms.
Beyond materials, presets also exist for print quality, speed, and cooling strategies. What’s particularly useful is the interface’s ability to “lock” certain parameters or highlight modified settings, which helps prevent accidental changes. Whether you’re fine-tuning retraction for a new filament or optimizing layer height for fine detail, Orca Slicer’s profile management tools bring structure to the otherwise chaotic world of print tuning.
Web Interface: Print from Anywhere, Anytime
The web interface unlocks remote access to your slicer. Whether you’re in another room or another city, Orca Slicer’s web panel makes it easy to monitor and control your print farm.
What you can do:
- Upload STL files remotely
- Slice models and send G-code to the printer
- Monitor layer progress and time remaining
- Get webcam access to check print quality
- Receive alerts if filament runs out or a failure occurs
This feature is ideal for professionals managing multiple printers or educators overseeing student projects. It adds efficiency, safety, and oversight to the 3D printing process.
Advanced Interface Tweaks: The Power Beneath the Hood
Beyond presets, Orca Slicer lets you tailor advanced interface parameters to the filament, printer, and part geometry.
Key areas to explore:
- Support material flow rate
- Fan speed variation based on print region
- Interface Z-offset for clean breakaways
- Pattern types that trade material for strength
These adjustments might seem small, but collectively they can cut print times by 20%, reduce material waste, and improve dimensional accuracy. It’s like upgrading from manual to auto-tuned performance, everything runs smoother.
Conclusion:
The Orca Slicer interface isn’t just powerful, it’s thoughtful. Every control, from model rotation to remote monitoring, is designed to enhance the printing experience without overwhelming the user. Whether you’re creating functional prototypes or detailed figurines, the UI scales with your needs. It strikes a rare balance between accessibility for beginners and deep functionality for experts. In a growing sea of slicing tools, Orca Slicer continues to set the bar.
FAQs:
Yes, the interface is clean and well-organized, with gradual access to advanced features, making it perfect for learning while doing.
Absolutely. Orca supports printers running Klipper, Marlin, and RepRap firmware. You can customize G-code output to match your printer’s requirements.
Orca Slicer receives regular updates that include bug fixes, UI enhancements, and slicing improvements. Automatic profile backups help you retain settings.
While not extremely resource-hungry, it works best on systems with at least a quad-core CPU, 8 GB RAM, and OpenGL 4.1-capable GPU.
Yes, via the web interface. As long as you’re on the same network or using remote access, you can upload, start, and monitor prints on mobile devices.